
Learning how to cure olives is truly so easy — and you might even be able to forage and pick them free from a street near you.
Because olives grow abundantly in so many cities (they’re often considered an environmental weed in southern Australia), yet often go unpicked. Why not go for a walk, find a tree in your neighbourhood and give it a go?
I’ve been curing olives from a foraged harvest since 2017.
Three large trees grow on a suburban street verge five minutes from my Adelaide home and, come early autumn, they’re usually laden with fruit.

Some still-warm day, I rope a (somewhat begrudging) group of mates into picking literal bucketloads, so we have olives coming out of our ears when they’re ready a few months later … which is OK by me. Home-cured olives are delicious and a jar or two makes for a brilliant last-minute homemade gift.
I use an old Sicilian-style recipe for curing olives, which requires just two steps.
- Step 1: Soak fresh olives in water for about two weeks (changing the water every day).
- Step 2: Cure olives in a strong salt brine. They need a couple of months in the brine before eating, then keep for at least a year (often longer) in that same brine.
I reckon this way is much better than preserving olives recipes that call for daily brine changes for the first fortnight, which leaves you with salty wastewater to dispose of. This way, the daily rainwater can just be poured straight onto your thirsty summer garden.

I often field lots of questions about preserving olives the Italian way, so I’ve documented the full curing olives process in detail below.
This is a traditional Sicilian olives recipe, as shared with me by a Sicilian family.
Table of contents
How to cure olives, the traditional Italian way
Ingredients
- Fresh-picked green or purple olives (extra points if they’re foraged)
- Unprocessed salt — rock salt or sea salt is best
- Rainwater or unchlorinated water
- A little olive oil (optional)
- Vinegar (optional)
How to tell when olives are ready to be picked
Late summer to mid-autumn is generally the olive-picking season here in southern Australia; they’re usually ready sometime between February and April.
You can pick olives while green or wait a little longer until they ripen further and turn purple, it’s up to you. I prefer the taste of green olives, so I keep an eye on the tree – when the first few olives start to turn purple, the whole tree is ready to be picked.
If you prefer eating black olives, you can also wait a little longer until most of the olives on the tree have turned purple. It’s totally up to your own personal preference.
Step 1: Soak olives in water for two weeks
Find a tree or three and wait until the fruit ripens to your preferred level (green or purple). Gather some friends and pick the olives, avoiding taking too much stem. Place them gently into your picking buckets to avoid bruising the fruit.
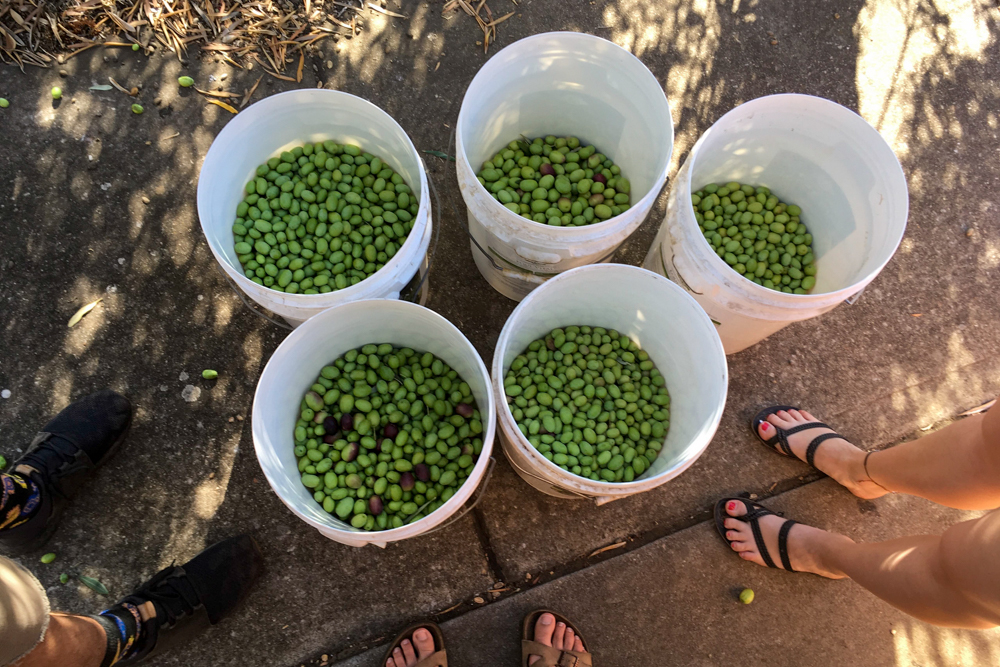
Back at home, place the olives into a container large enough to hold them all. (Pro tip: use a cooler box with a plug at the bottom, as it will be much easier to drain off the water each day.)
Fill the container with rainwater so all olives are covered; they might float, but that’s OK.
Change the water every day for at least 12 days. If your olives are larger, they’ll benefit from longer – up to 15 days.
This starts to release the bitterness. You will see, day by day, that the olives release more of a foamy, slimy texture (delicious, right?), caused by the bitterness and also a little of the oil content. So after draining out yesterday’s water, given them a little rinse before refilling. This is especially important in the last few days.
On the final day, drain and thoroughly rinse the olives.

Step 2: Cure olives in a saltwater brine for several months
Now it’s time to cure the olives by soaking them in a saltwater brine for several months.
Choose a container: Find a food-grade container or bucket/s with lids, large enough to hold all your olives – plenty of businesses give these away for free.
Make a 10% brine solution: The brine is made using a 10:1 ratio — 10 parts water to 1 part salt. That means for every 1 litre of water, you’ll need 100g of salt.
Calculating how much brine you need to preserve olives
As a rough guide, olives and brine should be in a 3:1 ratio. So, for every full bucket of olives, you’ll need about a third of a bucket of brine.
Here’s the easiest way to measure and mix enough brine:
- Fill the bucket with water using a kettle or measuring jug until all the olives are completely covered. Keep track of how many litres you’ve added.
- Multiply the total litres by 100 to calculate how much salt you’ll need (eg: 5 litres of water = 500g salt).
- Remove a few litres of the water, heat it on the stove, and stir in the salt until dissolved.
- Let it cool completely, then return it to the bucket and stir well to combine.

Pro tip: Cover the olives with a thin layer of olive oil, or lay a large plate on top of them (inside the bucket) to push them all under the salty brine.
This prevents air from touching the fruit, which helps to prevent creamy-white Kahm yeast from growing on the surface. You may still get some Kahm yeast (you can see a bit in the photo above) and this is totally OK as long as you don’t see any actual mould – just rinse off the olives and they’ll be fine to eat.
Place the lid on the bucket and leave the olives in the brine for at least three months, in a cool and dark place.
Taste your curing olives at the three-month mark
- If they’re hard and you’d prefer them softer, leave for a little longer.
- If they’re too salty, you can pour out a little brine and dilute with rainwater to make it less salty.
- You can also add 10% vinegar to the brine for a little more flavour and to help preserve your olives, but this is not essential.
How to cure olives: storing your harvest
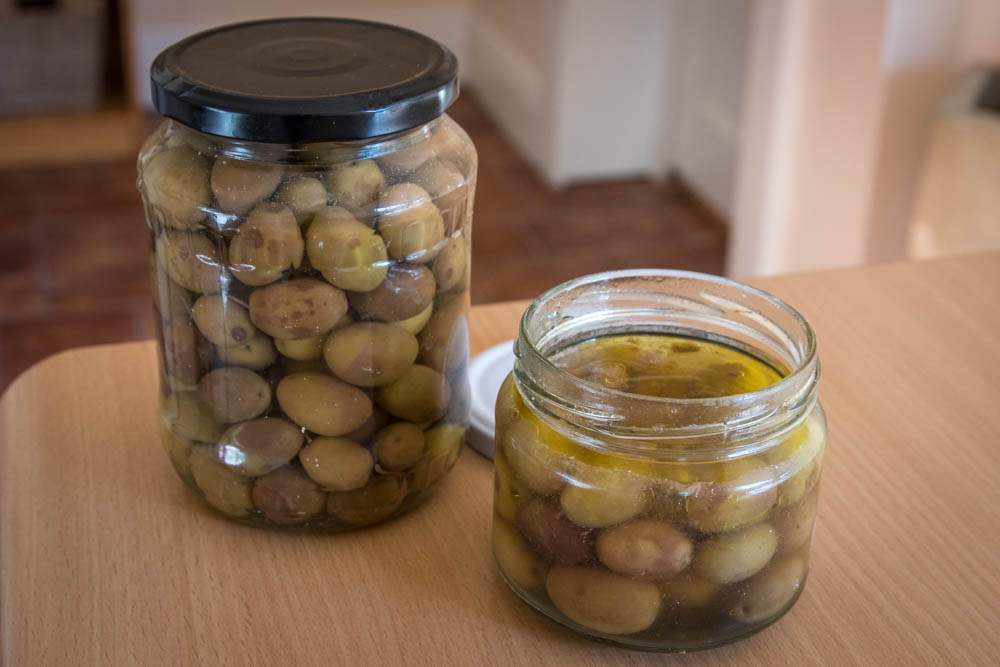
Your cured olives in brine will keep for at least a year, often longer.
I keep everything in the large bucket and spoon them out into smaller jars as needed – I always have a huge jar for myself in my pantry and often give smaller jars away to friends.
When spooning into smaller jars, pour brine from the bucket into the jar until the olives are completely covered, to ensure they’ll keep for months.
And as you’re removing olives from the big bucket, check the olive oil layer and top up if necessary – this will help them keep for longer.

Adding flavours to your cured olives
Once your olives are fully cured, there are two ways to add yum flavours using herbs and spices.
Infusion
You can split some olives into a smaller jar and add things to the brine, such as dried and crushed chillies, bay leaves, fennel seeds, vinegar, etc. Leave to sit for a couple of weeks and the flavour will gently infuse.
Frying
Alternatively, you can quickly jazz them up just before eating by heating a little oil in a pan, adding things like garlic and spices, and gently frying for a few minutes. They’re especially delicious served warm.
Or just eat them exactly as is. They’re great straight out of the jar too.
Salting
If you have a lot of salt lying around, and the olives you’ve harvested are on the smaller side, you might like to try this dry-salted preserved olives recipe from Milkwood, which can be flavoured with herbs.
So, now you know how to cure olives, it’s time to hop to it — find a tree near your place and get a’picking. Let me know how you go?
Share this with your mates
About the Author: Koren Helbig
About the Author: Koren Helbig
Oh hey, want to subscribe to receive blog updates?
Tell me your thoughts…
Comments are closed.


Thank you kindly. Unfortunately the birds, possums, (rats?) here in Sydney get 99% every year, before they are quite ripe. They chew and spit them out and litter the ground.Too much dangerous work to fine net the tree, as too tall now. But this year I am determined to do at least one small jar. Will follow your suggestions.
Darn, that sounds very frustrating indeed! Fingers crossed you get your precious jar this year. Or perhaps go for a walk in your neighbourhood and see if you can spot a street olive tree that isn’t so well-known by local wildlife?
Hello. Thank you for this foraging recipe. I request olive tree owners who don’t mind me picking their olives to let me know, so I can come pick them. I was looking however for a lost recipe I used years ago where once the bitterness had been removed with the salt brine, I kept them in jars with fresh garden thyme, garlic, chilis, lemon. I just do not remember how much vinegar I added to the brine and whether the brine was still the salty 1 part salt to 10 parts water from the original brining or if it had less salt. I was hoping to find a recipe here. Ill keep scanning for the “Sicilian” recipe advertised as it might clue me in.
Love that approach, Lesly! And yes, if you look at the ‘Adding flavours to your cured olives’ section of this blog post (right at the bottom), you’ll see some instructions for working with herbs and spices. You can also add up to 10% vinegar to the original brine (no need to make it less salty) for a little more flavour and to help preserve your olives, but this is not essential. Hope that helps :)
Hello thank you for your amazing guide I am currently up to the part where I let them sit in brine for 3months however they have been sitting in an airtight container for about a week in a cool dark place but this morning I have noticed the container starting to swell is that normal???
Hi Petra, so exciting to hear you’re having a crack at the recipe. I haven’t had any issues with the bucket swelling myself – my recommendation would be to open it up and check that there’s no obvious mould or other issues, and that the olives are all underneath the water (either with olive oil on top or held down by a plate). If all looks good, you should be right to close up and let them do their thing.
Thank you, Koren, for sharing this wonderful blog with all of us. My son and I recently came across a whole bunch of olive trees at a favorite local retreat (where they don’t do anything with their abundance of fresh olives), and decided that we would give olive making a try! I’ve followed your recipe, and am now wondering if I should cover my jar of soaking olives with a lid or a cloth or anything. I have a glass weight on top of the olives so that they are under the brine. Any recommendations?
Yaaay, this is so great to hear! Love that you’re making use of an overlooked resource. In terms of your question – during the first stage, when you’re soaking them in water changed daily, it doesn’t matter too much (altho I always cover mine, just to prevent any bugs getting in). In the second stage, when you’ve created the salt brine and are leaving them to cure, definitely cover them – a bucket with a lid that seals tight is best. Enjoy!
I have been unsuccessful with curing olives so far ,despite getting at least 10kg of olives per year from our tree,but have not tried the above technique.It looks good though and actually makes sense. I had obtained the wrong advice from various sources and there would be a lot of people not wanting me to know so that I have to buy cured olives. This website looks genuine so I will try the suggested technique.Thank you.
Great to hear – good luck with it, Peter. Here’s hoping you have a great harvest and yield this year :)
Hi Koren!
First time trying curing olives ever.
We moved into a house in Melbourne which had a tiny tree but with lots of small olives so picked 4 kgs worth of those plus…10kg from olive trees around neighbourhood parks which council encouraged. So…I have split my yields in 3 (1 from our garden), 2 from parks (1 x green/black mixed and 1 x just black olives).
First batch is currently in brining process – I’ve had to change the brine today as some mould has developed. I think it’s my fault – hoping you can confirm. I only had olive oil on the top of the brine (no plate holding them down as container was odd square shape) so some olives were floating in the oil. I’ve rinsed those out thoroughly, redid the brine and into a new round container with a plate holding all of them under the brine + olive oil on top juuuuuuust to be safe. So fingers crossed now! I’ll keep checking on them.
The other 3 batches are currently still in first stage of water soaking.
14 kgs of olives…I think I got overexcited! Thank you for sharing these clear instructions, it’s been super fun – also foraging from parks feels great instead of letting them go to waste. If I’m successful I’d love to make this a yearly family gig.
*For other first timers; don’t do what I did and get a square container – get a round one that way you can easily use round plates to hold your batch down under the brine. Unless you’re in luck with a square plate that is!
Hi Camille, what an epic first effort with 14kgs of olives! Bummer to hear about the mould. Keep a very close eye on it over the next few weeks, as it’s quite likely the mould has grown all through the whole batch – if so, they’re unsafe to eat. So, if you spot any more mould growing, I would throw away that whole bucket and consider it a learning for next year. Good luck!
I had my olives soaking in fresh water but forgot to change it. Some mould on a few of the top ones, the underneath ones seem fine. I drained, threw away the mouldy and brown spotted ones. Kept only those looking ok, no spots or brown patches. I rinsed them well, put them in new fresh water. Can I go ahead and brine them or should I throw them all away( plenty more on the tree!)
Hi Susanne, bummer that you’re having mould issues. In general, if you spot any mould (other than the kahm yeast mentioned in the blog post, which is often mistaken for mould), it’s safest to compost the entire bucket of olives and start again.
Hi Koren. Thank you for sharing this method. Do you cut the olives before starting the step 2 (curing them in brine)? I have a big harvest of olives from my friend’s place, and the thought of slicing each one of them is daunting!
Hi Soumya, nup – no need to cut the olives beforehand. This recipe avoids the need for that tedious step! Enjoy your harvest :)
I had a plate over my olives with 30mm of water above plate- but no oil and mould was growing in pockets on the surface – not sure the brine levels are high enough – i did the 1l to 100g ratio. ive scooped off the surface mould and added more salt resting on the plate it will obviously slowly osmosis through all the brine eventually…. and topped up with a little more water to compensate for the brine i took out with the mould and added oil ontop as well. Is there a trick to no mould with this method? So you need to add oil no matter what even if you have plate?
My previous methods worked where i did the wash in a brine solution and changed every few days for 2 weeks.
Hmm, sorry to hear that. The oil isn’t essential – if your olives are all completely covered by the 10% brine, you should be fine. Could it be the white kahm yeast, which people often mistake for mould (but is actually perfectly safe)? If not, it could be that the olives were bruised when picking, or that they needed more thorough rinsing before brining. You can also add a little vinegar to the mix to help increase the acidity and reduce the risk of mould.
Hi, am trying for the first time with olives, have harvested 3 buckets loads.
Have had in fresh water in a cooler for almost 2 weeks, changing daily,when i changed water last night, i noticed that the olives seem to be going mushy and brown . Have you had this before and is this normal
Hi Adam, it’s pretty normal for the olives to change colour a little during this process, as they start to morph from what a fresh olive looks like (bright green or bright purple) to what a cured olive looks like (muted sage green or dark purpley-black). Yours should be fine.
WATER: Just a few comments for those that don’t live in a place where actual rain falls, like I do in southern CA. DO NOT USE TAP WATER. Tap water contains chlorine and sometimes other chemical additives that impart unwanted flavors into olives. Use spring water or purified water instead. Or if you’re lucky enough, well water. Do change water daily.
SALT: All salt is not created equal. Typical table salt contains an anti caking, chemically treated, clays to prevent the salt from clumping in a salt shaker. Use Kosher salt or salts free of anti caking agents. These are both available in supermarkets in the USA. Make sure Kosher salts are free of caking agents also. Most are.
At the brining stage, I generally change the brine monthly for 3 months.
Lastly, keep all jars, containers, or crock pots that you use clean and sterile. This will prevent most unwanted yeast, and some bad flavors off the olives.
Hi Tom, thanks for these tips, very helpful for other readers. I wouldn’t recommend changing the brine monthly for the first three months though. In permaculture, we’re always looking to ‘produce no waste’, and repeated unnecessary brine changeovers create salty wastewater that has to be tipped down the drain. The brine step is a ‘one and done’ approach. :)
Hi
Thank you for this post.
A question about olives i just noticed a white film dusting to develop on the top of my kalamata olived that i purchased in bulk of 1 kg. Should i change the Brine?
How woukdi go about doing that?
Hi Abhaya, that sounds like creamy-white Kahm yeast growing on the surface. You can see a photo of this in the blog post, in the bucket of olives resting in my sink. This is totally OK as long as you don’t see any actual mould – just rinse off the olives and they’ll be fine to eat.