Growing great veggies is both easy and hard.
It’s as easy as finding a patch of soil and plonking some seeds or seedlings in. And it’s as hard as getting all sorts of variables right — water, sunlight, nutrients, soil, season, timing and more.
Here in the backyard of my urban Adelaide home, I’ve been growing veggies somewhat seriously since 2017. Lots of trial and error, lots of learning by doing and stuffing it up, lots of self-directed study with blogs, books, videos and fellow gardeners.
One short course I took really helped too.
It was run by Fleurieu Peninsula market gardener Nat Wiseman (Village Greens of Willunga Creek) and Adelaide urban farmer Steven Hoepfner (Wagtail Urban Farm) — who both surely rank among South Australia’s most talented veggie growers.

I actually took the Growing Great Veggies course back in late-2019. Almost two years on, I can see how it has fundamentally changed my approach to veggie gardening — and how much more successful I am as a result.
Having recently stumbled across my notes from this 1.5-day workshop, I thought I’d share them; for you to learn too, and also so that I have them safely recorded in a place I can’t lose.
A plant’s hierarchy of needs
Here we began: looking at everything a plant needs to survive.

The thing I’d never realised is, each unmet need is dependent on one another in ascending order.
You must get the bottom levels right first or they’ll always be a significant barrier to growth — and a possible reason your plant is weak and plagued by pests — no matter how perfectly balanced your top levels are.
This means, if you have just the right amount of water, compost and nutrients, but not enough sunlight, your plant will really struggle, as you’re missing that first base need.
Conversely, if you have the right amount of sunlight and water, but perhaps not enough soil structure, your plant will do a little better, as those base fundamentals are right.
The top-priority plant need: sunlight

This is such an important point because sunlight is something you can’t add more of. It all comes down to your veggie patch position and where the sun falls each season as it sits in the sky, higher in summer and lower in winter.
So one of the most important things you can do for your patch is to position it in a place that gets a full day of sun, all through the year. You can always add shade later if it’s too much. You can’t add more sun.
(I have a full sun mapping how-to article if you’re after tips on how to figure it all out.)
This seems so obvious once it’s pointed out, but it has made me look at my patch with new eyes. I’m now planning some veggie patch relocation, moving beds that sit mostly in full shade all winter.
Of course, full sun isn’t always possible in urban areas, where buildings can block a heap of light. So Steven and Nat recommended keeping the following in mind:
- Fruiting plants require 10+ hours of sunlight.
- Leafy greens will cope with only 6+ hours.
With these rules of thumb, you can more strategically place plants according to their sunlight needs.
The importance of both compost and fertiliser
Another huge ah-ha moment for me? That compost isn’t fertiliser. An organic gardener relying on just one or the other will most often produce poorer-quality veggies.
As Steven made clear, fertiliser in an organic system isn’t accessible unless your soil also has humus – a dark, mostly carbon-based spongy substance that remains after organic material has decomposed. This is where compost assists, by providing a regular supply of organic matter that slowly and continually breaks down to create more humus.
Once I embraced this fertiliser-and-compost duo in my backyard patch, my production literally soared.
So now you know you need both, it’s time to learn exactly how to use them. Below is an excellent video from Wagtail Urban Farm on how to prep your bed for planting, using compost and fertiliser. I do this every time now and it works wonders.
How to reduce shock when planting out veggie seedlings
Then we moved on to transplanting seedlings, and I discovered I was doing that all wrong too.
When planting out, hold the seedling by its leaves to avoid damaging the root ball or stem. It looks rough as heck, and the leaves will be a bit battered as a result. But it’s actually the kindest way to transplant, resulting in less shock.
And: don’t push the soil down around the plant at all.
Steven demonstrated this for us, and literally just plonked the plant in the hole, swished the soil back around the plant, and watered the whole lot in. Some of the little leaves were even covered in soil afterwards — but it’s really no big deal, Steven insisted. They’ll bounce back, and more quickly than if you unnecessarily manhandle the leaves.

As for watering in, Nat’s hot tip was to keep going until the water puddles for 10 to 20 seconds on the surface of the soil.
Again, I was so surprised by this — as it can actually take quite a while. But it’s a great way to ensure the water is actually penetrating down to the seedling’s roots, where it’s needed. No more wetting the surface of the soil and thinking all is dandy, only to discover your new seedlings are parched and cactus a few days later.
How much to water your veggie patch
This was the part where I discovered I’d been massively underwatering my veggies. Hmm, maybe that’s why they looked so straggly and sad for so many years?
For Adelaide gardeners — we’re in a warm temperature climate, where summer temperatures often reach over 40 degrees — Nat and Steven have a rather straightforward recommendation.
Ensure your veggie patch receives 25 litres of water per square metre, twice weekly during summer (if we’ve had no rain), they say.
Two 1.5-hour drip irrigation schedules each week are a good start, although this will depend a little on the makeup of your soil. Sandy soil needs shorter and more frequent bursts, as the water tends to run straight through.
Not sure what kind of soil you have? Try the jar test to figure it out.

Observation will help you check if you’re watering enough: your plants will often wilt during Adelaide’s hottest summer days; if they stand back up after the sun goes down, they’re probably doing just fine and have enough moisture. If not, up your watering regime.
In general, once the temperature climbs over 40, you might want to add additional half-hour evening waterings into your schedule.
To make this even easier, get a tap timer that allows you to set both frequency and duration (these cost about 50 bucks). It means you can automate the whole system.
This was a total gamechanger at my place, as it turns out I’m appalling at remembering to water my veggies. Since installing irrigation and timers, my summer harvest has doubled.
How to calculate exactly how many litres are flowing onto your patch (when using drip irrigation)
OK, so we have the ‘25 litres of water / square meter / twice weekly during summer‘ rule. Great. But how the heck do you know how many litres are actually going onto your patch?
Nat led a fascinating discussion on how to calculate this for those who have drip irrigation set up. Get ready to do some maths…
First, you need to figure out your flow rate (litres/hour)
Option 1: A lot of drip irrigation has a flow rate of about 2L/hr. This means, under normal urban water pressure, two litres of water comes out of each dripper hole each hour. So, if you’re using mains water or have a pump, you can fairly safely guess that your flow rate is 2L/hr per dripper hole.
Option 2: If you’re using gravity to feed your irrigation (perhaps you don’t have a pump on your rainwater tank, for example), you’re better off calculating your specific flow rate.
- Turn your irrigation on.
- Place a 250ml measuring cup underneath one of the drippers.
- Time how long (in minutes) the cup takes to fill. For example: 8mins.
- Now divide 15 by the number of minutes to calculate your flow rate. For example: 15 / 9mins = 1.6L/hr per dripper.
Then, count roughly how many dripper holes you have per square metre — to calculate how long you need to water for
Find a space in your patch that’s roughly one square metre and follow the lines of irrigation within, counting exactly how many dripper holes lie within that square metre.
That will allow you to complete this last calculation:
- Dripper holes x flow rate = litres per hour per square metre.
- Then – take 25L (the total amount you need to water at a time) and divide this by your litres per hour per square metre figure.
- This final figure will give you the amount of time you need to keep your irrigation on to give your garden 25L of water per square metre.
Confused yet?
Let’s complete the calculations for the options outlined above, imagining that we have 5 dripper holes within our 1sq m:
Option 1 (standard 2L/hr flow rate):
5 dripper holes x 2L/hr = 10L/hr.
25L / 10L/hr = 2.5 hours.
So you’d need to have your irrigation on for 2.5 hours to get to the 25L goal.
Option 2 (your own calculated flow rate):
5 dripper holes x 1.6L/hr = 8L/hr
25L / 8L/hr = 3.125 hours (or 3 hours, 7 minutes).
So you’d need to have your irrigation on for 3.12 hours to get to the 25L goal.
And what if it rains?
Here’s another calculation to keep in your toolkit: 1mm of rainfall on 1 square metre of ground = 1 litre of water.
So 6mm of rainfall would equal 6 litres of water falling on your patch, per square metre. And suddenly that seems like not much, when you know your patch needs 25 litres of water twice weekly, right?
Mind-boggling. I’m truly so grateful for this part of the session.

Some other pearls of wisdom for growing great veggies
— “Labelling is 90% of gardening.” This is Steven’s favourite saying. I still have not learnt my lesson.
— For long-handled tools such as rakes and hoes, Nat says the handle length should reach to about your nose. This means it’s the perfect size for you; less awkward stooping, less back problems.
— The ideal soil pH for most common fruits and vegetables is 6.5 to 7, or even 7.5. That’s when the most nutrients are available to your plant. So if you feel like everything else is bang-on but your plants are still sad runts, try a pH test.
— Steven tries to plant out in the evening, if possible — it helps minimise transpiration, which in turn minimises stress.
— Cool-season crops, such as lettuce, will germinate better if placed in the fridge for a couple of weeks before planting.
— Maybe just watch the entire video below? It’s a chat I had with Steven as part of the 2021 Adelaide Edible Garden Trail event and it is *packed* full of useful tips to try in your own garden.
And some local business recommendations, for South Aussie gardeners trying to avoid a certain big green shed…
Nat and Steven also generously handed out recommendations for all sorts of local folk selling gardening needs on a small-scale, human basis.
- Di Bickford’s Bickleigh Vale Farm, for excellent quality organic seedlings, grown near McLaren Vale.
- Heirloom Harvest, also on the Fleurieu, for locally grown SA heirloom seeds.
- Bennetts Magill Pottery make high-quality handmade terracotta garden pottery, here in Adelaide.
- SMOULT Mobile Horticultural Suppliers, a small SA business delivering nursery and garden products free in the Adelaide metro area.
- Plasflo Irrigation in Adelaide are apparently the folks to see for all irrigation needs, and yes, they’re a small SA business.
- And I’ll add Nomad Nursery, a plant nursery based on permaculture principles.
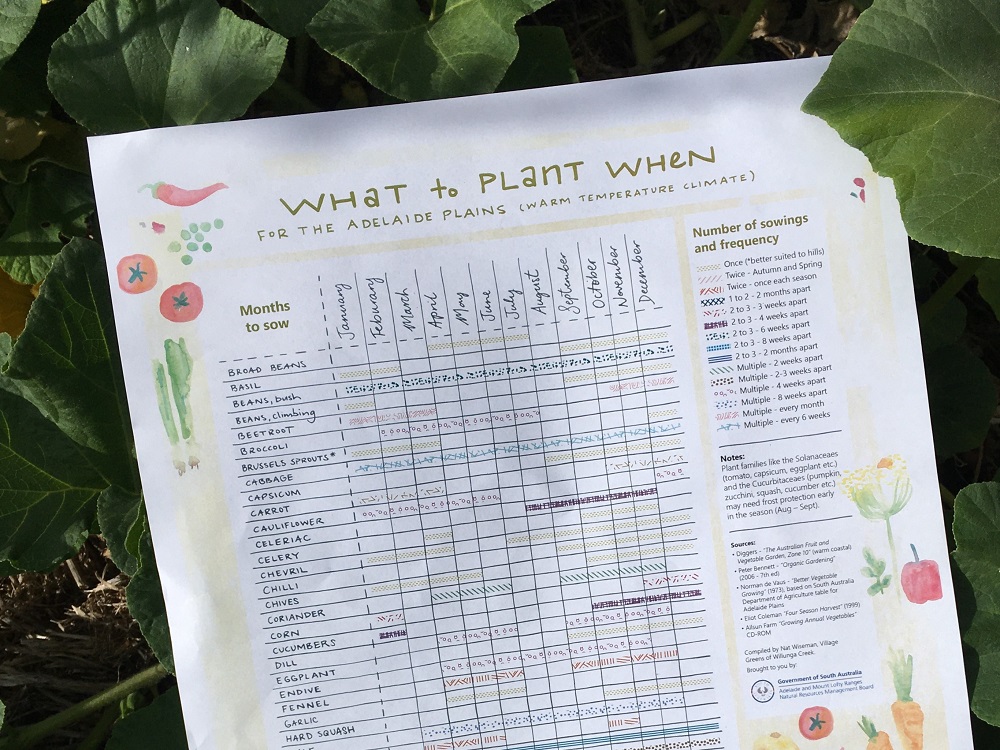
One more thing! Nat’s free downloadable planting calendar for the Adelaide Plains
All this is literally just the tip of the iceberg when it comes to the immense amount of knowledge Steven and Nat imparted during this short course. So next time you see their names on a workshop presenter list, book in — stat. You’ll almost certainly walk away filled with motivation and empowered to grow better food.
And — the course included an excellent ‘What To Plant When’ calendar developed by Nat. He used his big, data-lovin’ brain to aggregate a heap of different sources and create a deeply useful planting calendar specifically for people living on the Adelaide Plains.
You can get yourself a free downloadable copy from the SA Urban Food Network. Enjoy!


Thank you,
I found your blog when searching for soil testing in Adelaide. My veggies can be good but never perfectly lush and totally healthy looking.(except zucchini’s) 😂 My tomatoes always lack something that over the years I have blamed on soil, water (over or under watering) any number of real or imagined diseases, scorching sun, hoare frost, compacted underlying clay soil, the dreaded wilt. The pyramid says it all. I must re-read and hope the course you mention is still a regular event. Cheers sheryl
Hi Sheryl, I can totally relate to this sentiment! Glad the pyramid is helpful — and yes, I think the Growing Great Veggies course still runs from time to time, so definitely keep an eye out for it. :)