Creating a sun map is crucial for knowing exactly what to place where in your garden.
Because edible plants need sunlight to grow — the more of it, the better — yet the sun changes position across the seasons, dropping lower in winter and throwing longer shadows across the earth.
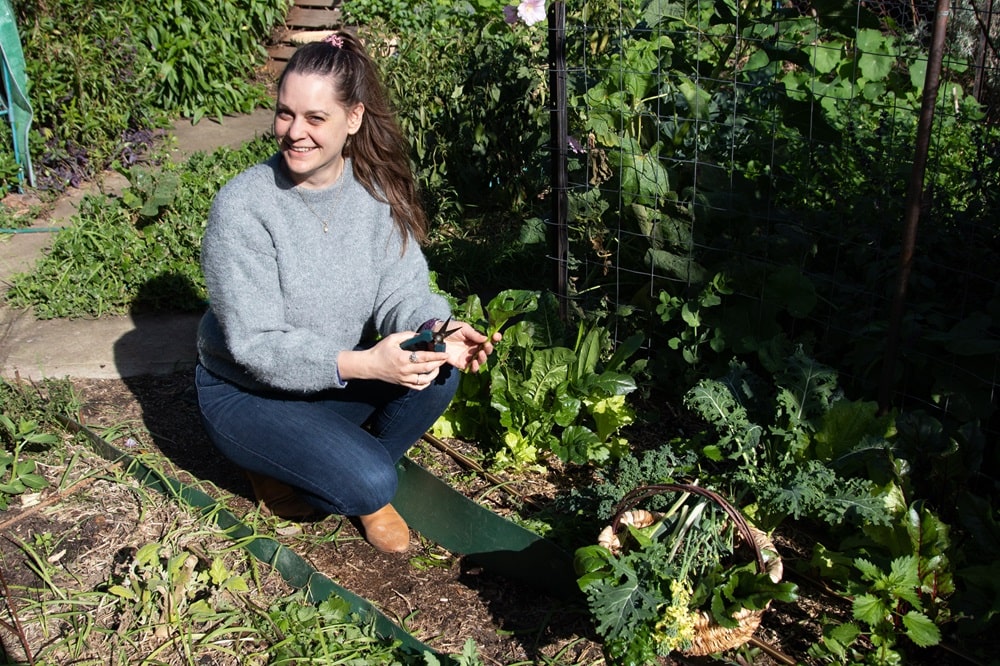
When I first started veggie gardening in my small urban Tarntanya / Adelaide backyard, I didn’t even think to consider all this.
As a result, half of my small growing space was plunged into deep shade for at least four months each year, limiting the food I could grow there.
Enter: sun mapping, a permaculture process that helped me figure out where the sun falls at my place year-round and therefore how to reshuffle my garden layout to place my veggie beds in the best spot to pump out food.
The best time to start sun mapping is winter
Somewhat counterintuitively, winter is the best time to start mapping sunlight, as the shadows are longest, revealing the limit of where you can grow in cooler months.
But ideally, you want to map your garden’s solar access for a full 12 months before making any big decisions or changes (yes, really!). So you can start the process at any time of the year.
In permaculture design (where I learnt this technique), sunlight is one of many ‘sectors’ you map when planning — figuring out energies passing through your garden and how they can best be harnessed to provide a yield.
The ideal spot for a veggie patch gets as much full sun as possible, all year round. You can always add shade later if needed. You can’t add more sun.
“In all but hot, dry inland climates, more sub exposure is better than less. Even in warmer climates it is easier to add shade by planting productive trees and vines in the right locations than it is to do much about lack of sun.”
— David Holmgren, Retrosuburbia
But solar access can be tricky in urban areas, where tall buildings or high fences block much-needed light. Funnily enough, it’s often where people plonk lawn — right in the centre of a garden — that would be the best spot to grow stuff.
So for city folks, it’s arguably more important than ever to sun map your garden, as your growing options may be more limited compared to spacious and less shady country landscapes.
The simplest way to make a sun map: observation
Step one is to observe what’s going on at your place for a full year, throughout all four seasons.
You might take photos from the same place in winter and summer — at morning, noon and afternoon each time — for a visual on where the sun falls. Or roughly sketch out your garden and draw shade patterns over the top. Or even just stand in the space, mentally clocking: “Ah yes, the shade reaches to this path or that tree.”
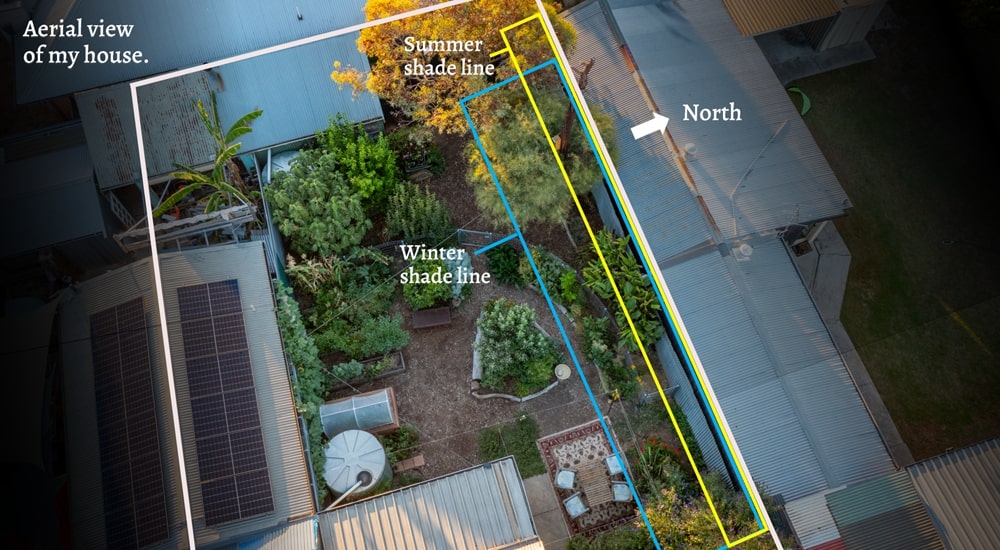
I printed a Google Earth map of my backyard, traced a copy onto fresh paper and sketched where the hottest spots were in my garden and how deep the shade fell in winter.

The results can be quite surprising. For example, I discovered a summer fence line shadow of half a metre grows to a whopping to 4.6m in winter. Which explains why annual veggies failed to grow in that spot in the cooler months!
During this one-year observation phase, I also documented other helpful things on my garden map, such as:
- The direction of north on my map.
- Which direction the wind and rain usually came from.
- How much rainwater or greywater I could capture and reuse.
- What type of soil I have.
- Which existing plants grow well and what seems to struggle or need special care.
Other sun mapping options: use apps and other tech
If you don’t have the luxury (or patience!) of watching your space over a full year, nifty tools and tech can help map your sun patterns right away — with a bit of maths.
The Sun Seeker phone app (available for both Apple and Android) is my favourite — although it does come with a price tag. Sun Seeker uses your phone’s GPS and compass to find the solar angle at your location, at any time of the year. Similar apps exist but none are quite as good, and there’s also a few online options if you’re using a computer.
If you’re keen to quickly work out where the sun and shade falls, then a bit of maths is involved. Trigonometry to be exact. Let me break it down:
- Say you look up the sun angle (a) at mid-winter.
- Next, measure or estimate the height (H) in metres of an obstacle around your garden — your house, the back fence or that giant tree.
- With these two figures (angle and height), you can calculate the length of shadows using a trigonometry formula and a calculator, where length = H / tan (a).
- Or just use this online calculator.
Complete this calculation for both mid-winter and mid-summer, and you’ll understand the moving shadow patterns in your growing space.
This was all a bit too complicated for me, which is why the simpler version of sketching rough shade lines onto a printed map throughout four seasons proved the more attractive option.
Use your sun map to decide where to place your veggie patch
Finally, it’s time to put all that information to use.
Now that you know where the sun falls, you can strategically place plants according to their sunlight needs.
As a rough guide:
- Fruiting plants require 10+ hours of sunlight.
- Leafy greens will cope with only 6+ hours.
In spots that get less than six hours of sunlight, you’re probably going to struggle to grow food (sorry). See below for ideas on what to do in unavoidably shady spaces.

Sun map example: my small urban city backyard
I live on 478 square metres here in Tarntanya / Adelaide and have dedicated the back one-third of my block to a permaculture garden, which includes annual veggie beds, a food forest, chickens and bees.
I first moved here in 2017 as a renter and completed a year-long sun map a couple of years after moving in.
It showed that half my annual veggie patch fell into deep shade throughout winter, meaning basically nothing would grow there. (For years, I honestly thought I was a bad gardener! Turns out, sunlight really matters.)
Because I was renting at the time, I couldn’t physically move my patch.
However, the sun map allowed me to make more suitable planting decisions for winter. For example, the sun-hungry broccoli and caulis went in the bit that was always sunny, while leafy greens edged towards areas that gradually got shadier. And in the deep shade, untouched by sun until late spring, I left the beds fallow for a few months.
After a few years, I was lucky enough to be able to buy that same house.
Armed with my garden map filled with observations, I knew exactly which how to reshuffle and change the space, transforming my city backyard into a food-producing permaculture paradise.
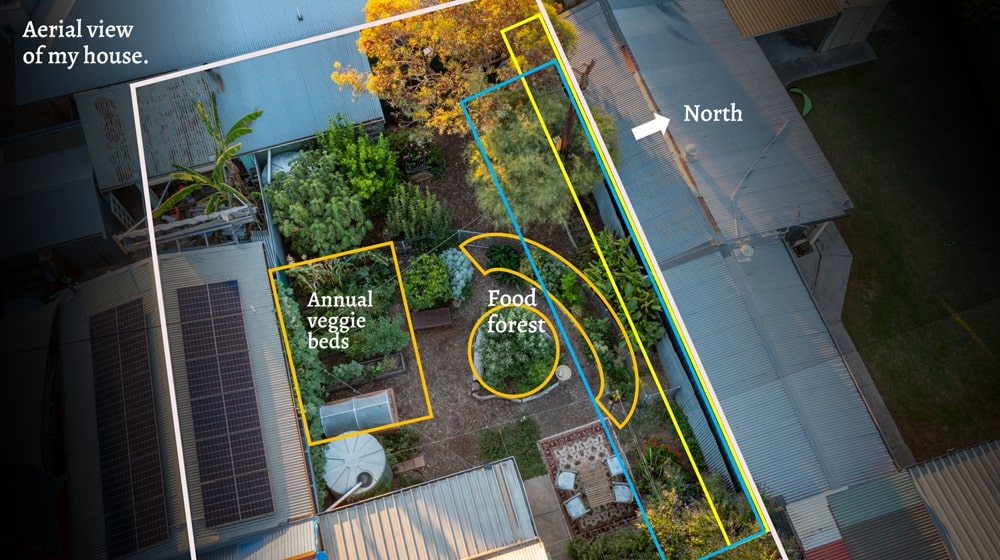
I moved my annual veggie beds to a much sunnier spot along my southern fenceline, where they get at least six hours of sunlight throughout the year.
And in that challenging area that falls into deep shade during winter, I planted a mini urban food forest.
That spot may not be good for annual veg growing year-round, but it’s excellent for deciduous fruit trees that drop their leaves during the cooler months and therefore don’t need sunlight to photosynthesise. The trees also stand taller, so they can capture more light for longer than plants at ground level.
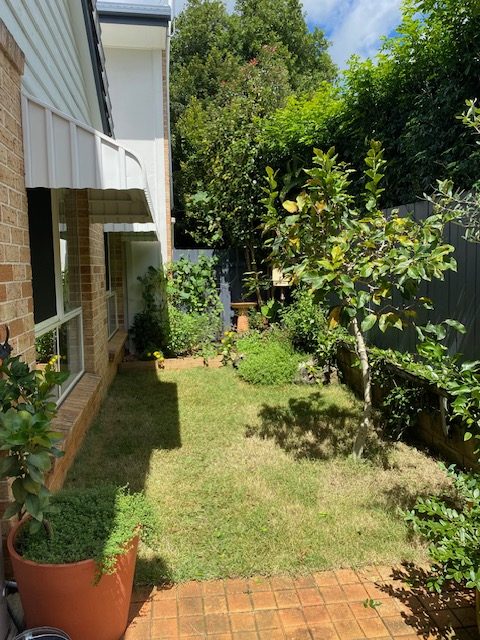
Sun map example: Nicole’s tiny courtyard garden
My friend Nicole Lutze lives in a small townhouse (total block size is 166 square metres) on the Sunshine Coast and is determined to grow as much food as possible in her tiny courtyard garden. What a legend.
After buying the home, Nicole wanted to upgrade her ornamental garden into a food-producing haven. So, together we mapped the sun and shade across her narrow courtyard.

The sun map helped us make several key decisions, including:
- Moving her Vegepod raised bed to a north-east corner bordered by two high fences; the pod’s height will allow the plants inside to capture more sunlight compared to plants grown at ground level.
- Adding a passionfruit vine to grow up a north-facing brick wall, helping cool her home while also utilising vertical-growing space in a small garden.
- Creating a new in-ground veggie bed in a south-west corner, which has the best solar gain of the whole garden.
- Removing a compost bin that was taking up a lot of space and swapping to in-ground worm towers, which made room for more veggie beds while allowing Nicole to home-compost her food scraps in a way that benefits her garden.
Nicole also removed a heap of gravel and planted native grass turf to help cool and beautify the space. The before-and-after is pretty incredible!

You can see more before and after photos of Nicole’s place on this Instagram post.
Options for growing food in unavoidably shady spaces
If you live in an urban area or an apartment with a small balcony, you might not have the luxury of choice. If you have just one spot for growing and it’s largely in shade, the bad news is that you will struggle to grow healthy, high-yielding food plants.
Before you give up completely, map the sun.
Plenty of leafy greens will cope with only six hours of sunlight a day, so you might have enough light to grow veggies such as lettuce, kale, spinach and herbs. Or perhaps you could decide to only grow food in the warmer months, when the sun’s higher position brings more sunlight into your growing area.
If none of this is an option, you might need to find somewhere else to garden — perhaps a nearby vacant block, your street verge or a local community garden.
There’s always a way to grow food! Happy sun mapping.
PS: Here are a few extra resources on how to sun map and set up edible gardens.
- How I’m creating a food-producing permaculture paradise on my small city block — full details of how I planned my garden and home design according to permaculture principles, using sun mapping, of course!
- How I created a mini urban food forest in my small Adelaide backyard — more detail on my home food forest, which I deliberately placed in an area that falls into deep shade in winter.
- Retrosuburbia by David Holmgren — see page 75-77 for an excellent description of sun movements and how your land aspect will be influenced, plus a couple great diagrams to help you understand.
- Earth Restorer’s Guide to Permaculture by Rosemary Morrow — probably my fave permaculture book of all time, it has HEAPS of useful, practical information on setting up a permaculture home and garden.
- The Permaculture Home Garden by Linda Woodrow — another really solid, practical guide on growing organic food in the Aussie climate.


